Sunday, September 15, 2013

Seafood Cannelloni

Sticking with the theme of lasagna rolls this week, I present my last version of Seafood Cannelloni. I love the taste of this dish but, I've ordered it in a restaurant a few times and the portion sizes are definitely something to frown about. Most times, you get 2 or 3 pieces of pasta, boo! So, why not make them at home and have as much as you want?
 
My seafood part of it was nothing crazy. Some imitation crab meat and salad shrimp, but you can add anything you like. Scallops, clams, crab meat, lobster, or anything like that would be awesome with this dish. You can make it as expensive or as inexpensive as you want!
 
1 package Lasagna, cooked
1/2 package imitation crab meat, shredded
1 package or can salad shrimp
1/4 cup shredded cheese mix
2 cups finely chopped cherry tomatoes
1 scallion, chopped
1 Tbsp tomato paste
1 Tbsp light cream
1 Tbsp butter
2 Tbsp fresh chopped parsley
2 Tbsp finely chopped carrot
2 Tbsp finely chopped celery
3 Tbsp chopped onions
1 cup white cooking wine
1/2 Tsp lemon pepper
1 Tsp fresh lemon juice

Recipe Adapted from Epicurious
Cook lasagna noodles according to package directions. Drain and lay them all out flat on counter top or work surface.
Shred your crabmeat and place into a bowl with the shrimp. Mix and season with lemon pepper and toss with lemon.
Spread the seafood mixture evenly over all the lasagna noodles being used.
Begin preparing your sauce by chopping all chopped vegetables and placing them into a saucepan. Add tomato paste, cream, and butter and saute for 5 minutes until vegetables begin to get tender. Add cooking wine and stir frequently until the sauce comes to a full, rolling boil.
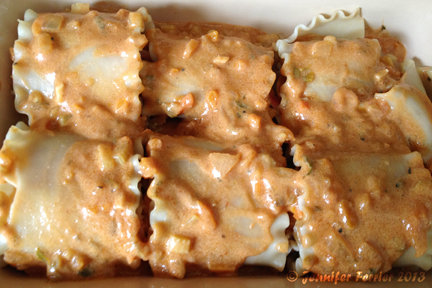
Spoon sauce over the seafood on each noodle. Roll jellyroll style, from one end up into rolls. Gently place them in a small casserole dish. Spoon over any extra sauce and top with shredded cheese. Bake  covered with aluminum foil in a 350 degree oven for 30 minutes.
Saturday, September 14, 2013

Caprese Lasagna Rolls

I was so happy with Lasagna Rollata, that I thought I'd go right on ahead and try a new Caprese recipe. I definitely wanted the full on mozzarella taste with no ricotta (but I added it to the sauce). The recipe I was basing this on was using shredded mozzarella cheese, which I didn't think would be authentic in taste. I went for the small mozzarella balls and had no problems at all with using them.

1 package Lasagna, cooked
1/4 cup of grated Parmesan cheese
10 small fresh mozzarella balls
2 Tsp garlic powder
1 Tsp onion powder
2 large beefsteak tomatoes, sliced and halved
1/4 cup very finely chopped fresh basil

Sauce:
2 Tbsp Italian seasoning
1 1/2 cups tomato sauce
1 cup milk
1 cup shredded cheese
leftover filling
1/2 cup ricotta cheese

Recipe Adapted from Cooking Classy

Cook lasagna noodles according to package directions. Drain and lay out flat on counter top or work surface. Take mozzarella balls out of any water or brine that they are packaged in and lay them out on some paper towels. Cover them and give them a gentle squeeze to get off any excess water. Then, throw them into a food processor and puree into a paste. Add the garlic and onion powders.

Using spoonfuls, spread the filling thoroughly over one side with the back of the spoon. Space your tomato slices evenly over the lasagna, starting about a half inch from the first edge that you will roll. Roll jellyroll style, from one end up into rolls. The filling makes an adequate "glue" and they should stay together well. Gently lay them down in a casserole dish.

Add any leftover filling to a saucepan with the rest of the sauce ingredients. Heat and mix thoroughly over medium heat until the sauce begins to boil. Pour over lasagna rolls evenly. Bake in a 350 degree oven for about 30 minutes.
 

Friday, September 13, 2013

Lasagna Rollata

Before I share a new recipe with you, I'd like to apologize for my absence on here. Basically, as most people do, I can admit that I have had too much on my plate. My husband (and some friends) had remarked that I seem to only be happy when life is so crazy this way. Between photography, work, 3 dive clubs, marine mammal strandings, cooking, blogging, and a personal life...something had to give. Apparently this was the thing.
 
Looking back, I was shocked the other day to see that I had only published one blog last month. Since I originally wanted to have one everyday (a crazy goal!), this was certainly not how it turned out. Although my cameras, phone, and computer is filled with plenty of material, I have to put it all together and I'm going to be happy if I can publish a few blogs a week from now on. I apologize for starting out like gangbusters and then fizzling out but, I don't want to ever really quit doing this so unfortunately this is the way I have to do it. I hope my followers and readers understand and stick with me on my journey. Okay...on to the recipes!
 
1 package Lasagna, cooked
1/2 cup breadcrumbs

Filling:
1 large egg, beaten
1/4 cup of grated Parmesan cheese
1 cup ricotta cheese
2 Tbsp Italian seasoning
2 Tsp garlic powder
1 Tsp onion powder

Sauce:
1 1/2 cups tomato sauce
1 cup milk
1 cup shredded cheese
leftover filling
 
Recipe Adapted from Recipes, Recipes, Recipes
I've mentioned before that I am not a fan or ricotta. My tastes have certainly grown to like it more as an adult, though. I just makes sure it's thoroughly spiced up so it doesn't taste bland to me.
 
Mix the ingredients together in a bowl for the filling. Cook lasagna noodles according to package directions. Drain and lay out flat on counter top or work surface.
Using spoonfuls, spread the filling thoroughly over one side with the back of the spoon. Roll jellyroll style, from one end up into rolls. The filling makes an adequate "glue" and they should stay together well. Stand them up on their ends tightly placed in a small casserole dish. If you have empty space on one side of the pan, you can fill it up with meatballs, sausages, or whatever you might have on hand to compliment the dish.
Add any leftover filling to a saucepan with the rest of the sauce ingredients. Heat and mix thoroughly over medium heat until the sauce begins to boil. Pour over rollata evenly and top them with breadcrumbs. Bake in a 350 degree oven for about 30 minutes.


Tuesday, August 13, 2013

Fall Roasted Pumpkin Seeds

I know I'm jumping the gun here but, I love the fall in New England! I love everything about living here and actually getting to experience foliage when we don't just have an onslaught of rain. Fall is my favorite season. I'm a sucker for the Topsfield Fair, apple picking, Pumpkin Spice lattes, cider donuts, the smell of our first fire, cuddling in sweatshirts, plaid shirts, and boots. Let's not forget pumpkin carving! Every year I try to carve some elaborate pumpkin for my house and end up with all these seeds! 

I'm not a fan of pumpkin seeds. For years, I tried recipe after recipe, and just never cared for them. Since I hate to waste anything, I kept making them until I came up with this one. Now, I leave them on a dish on my counter after I make them and they are gone in no time! The flavoring captures everything I love about fall in New England! And don't throw away that pumpkin either! I have plenty of recipes for not just pies but, pumpkin cookies, muffins, and loaves that will make you want to savor every bit of your carving pumpkin. 
Take a large carving pumpkin (mine was 12 lbs) and scoop out all the seeds. Try to separate as much of the seeds as you can from the pumpkin goo (That's the technical term, right?) but don't wash them. Put them in a bowl and toss them with 3 Tbsp of apple juice or cider and 1 Tsp of maple syrup. Spray a baking sheet with non-stick spray and pour the seeds out onto it and spread them out evenly. It does get sticky so if you have a new pan, you might want to use aluminum foil to line the pan. Then I put a few Tbsp of vanilla extract in a squirt bottle and evenly spray the seeds. A Misto works well but spray generously! Then sprinkle them with 1/2 Tsp nutmeg and 1Tbsp of cinnamon and roast in a 375 degree oven for about 20 minutes. I make sure they are well dried out in the center. Let cool for a few minutes but don't wait too long or they will dry very sticky and hard. Use a metal spatula to scrape them off the pan and mix them up and separate. Wait until they are completely cool before packaging them up at all, but they last a long time covered or in plastic. I've kept them to top baking dishes months later and they are just as good as the day you made them! 

Thursday, July 25, 2013

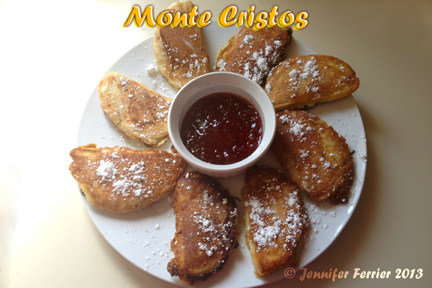
Monte Cristos

 If you've never had a monte cristo, I'm afraid you are missing out. I am not a person who mixes foods at all. If they made separated plates in fine china, I would own them. This is one of these dishes that "it's ok because someone else did it and it's accepted". That's my story and I'm sticking to it. 

A monte cristo is basically a sandwich made of ham, turkey, and various cheeses that is coated in a pancake like batter, pan fried, and served with a fruit jelly! This would surely wow any brunch guest. You can serve them cold as well but, they are better warm and melty. 
The first batch, I made for some guests and used leftover hamburger buns. Traditionally, it's made with bread and there is an extra piece in the middle, kind of like a Big Mac. I preferred the thickness of hamburger buns. The second time I did it (above), I used some cinnamon raisin bread. Use your creativity because mostly anything can go here. The only thing I wouldn't do is use condiments on the sandwiches. 
Layer the cheese closest to each slice of bread. I used cheddar and American but, again use Swiss, Monterrey Jack...whatever you like. Then layer turkey and ham on each side and close the sandwich. Press down hard on each sandwich to squish it. Then stack them and press down hard again to get them nice and thin. 
They should be refrigerated as long as possible. It's best to assemble the sandwiches the day before if you can! This helps seal them together. 
When you are ready to fry them up, heat up a nonstick skillet on low. The popular way to cook these is to use oil and fry them but I just can't cook like that. A bit of spreadable butter will do well pan frying them for me. 

Mix up a pancake like batter. This is what I use:
1/2 cup flour
3/4 Tsp baking powder
1/8 Tsp salt
1 Tbsp sugar
1 egg
1/2 cup milk
2 Tsp vegetable oil

Your batter should be runny, so you want to thin it out with water or milk. It should coat the sandwiches without allowing you to see the meat and cheese but not be as thick as batter. Then, carefully dip the sandwiches and fry them for 2-3 minutes on each side until brown. 
While still hot, dust them with some sifted powdered sugar. They are mostly served dipped in raspberry jam, but strawberry or blackberry work as well. Enjoy the eewy gooey breakfast goodness!

Wednesday, July 24, 2013

Pesto Pine Nut Spaghetti Squash

I'm sure it comes as no surprise that I love spaghetti squash, if you follow my blog. Cook the squash according to my directions here. Then, mix the squash with your favorite pesto sauce. I made some with fresh herbs from my garden. 
You can use whatever you grow: oregano, parsley, basil, cilantro...and mix it up with minced garlic, olive oil, and Parmesan cheese in a food processor until you have a thin paste. You can add spinach or arugula as well. Either add the sauce and mix into the squash or do it in a separate bowl and then scoop it back into the squash to make a bowl. Top with pine nuts, some shredded or Parmesan cheese, and bake in a 350 degree oven for 10-15 minutes, until cheese is melted.
 
Recipe Adapted from Delightful Country Cookin

Tuesday, July 23, 2013

Citrus Roasted Chicken

This whole chicken recipe is wonderful for a spring or summer evening. Just don't cook it on a really hot day when you don't want to keep your oven running for hours. You can serve it with anything and cook veggies right under the chicken. I threw in potatoes and carrots. 

Take an oven stuffer roaster and pull out the innards. Trim any excess fat or skin that you wish and place in a roasting pan. Pour 1 Tbsp of honey over it and rub in. Zest 1/2 a lemon and 1 orange over the chicken, spreading it around. Squeeze the half lemon over it, then juice the full orange over it as well. Place the oranges inside the cavity. Sprinkle with 1 Tsp garlic powder and 1/2 Tsp onion powder, 1/2 Tsp sage, and 1/2 Tsp thyme. Top with fresh cuts of rosemary and a dusting of sesame seeds. 

Roast according to package directions depending on the weight of your chicken.  You don't need to add any water to the pan, but if you are worried, you can add 1/4 inch of chicken broth to the pan if you like veggies more tender than crispy. The juices will give the vegetables a great taste but you might want to melt some butter over them when you are done cooking them.