Sunday, March 31, 2013

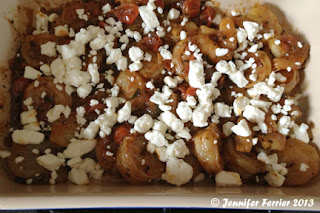
Greek Shrimp

A few years ago, I signed up for a Greek cooking class from North Shore Community College. I really just wanted to learn how to use Filo dough better and the teacher quickly asked why I wasn't teaching the class instead! While I was having a good time catching up with my high school friend Katie, who had recently married a Greek guy and wanted to surprise him with a few dishes, I did manage to perfect my use of the dough as well as nab this great dish that I never would have really thought of by myself. It's a wonderful wine reduction that I never fail to get rave reviews on! My friend, Alyssa, also took this to a party and told me that the dish was scraped clean!
 
Just make sure you use a good wine because it will be the dominant taste of the dish. Never cook with any wine if you wouldn't want to drink it.
 
3 Tbsp olive oil
2 ½ cups chopped onions
¼ cup chopped fresh parsley
1 clove minced garlic
½ Tsp sugar
3 Cups chopped plum or cherry tomatoes
1 Cup Retsina or white cooking wine
1 ½lbs peeled shrimp
1 cup crumbled feta cheese
Preheat oven to 425 degrees. Warm the oil in a large skillet over medium heat. Add the onions and saute until a light golden brown, about 7 minutes. Add the parsley, garlic, and sugar and stir to mix. Add the tomatoes and cook until they soften and the liquid is absorbed, about 20 minutes. Add the wine to the skillet and cook until the liquid is absorbed. Add the shrimp and cook, stirring occasionally, for 30 seconds. They will cook really fast!
 
 Remove from the heat. Pour contents into a casserole dish. Top with feta cheese and bake until cheese melts, about 5 minutes.


Saturday, March 30, 2013

Confetti Couscous

This is a great side for a holiday feast, yet simple enough to make on a weeknight. The colors make this a beautiful and tasty dish. I'm a big fan of couscous over rice.
 
1 cup water or chicken broth
1 cup uncooked couscous
3 minced celery stalks
1 minced carrot
1/2 cup sliced onions
1/2 cup dried cranberries
1/4 cup sliced almonds, toasted

Recipe Adapted from Sisi's Kochen Und Backen
 
Cook couscous according to package directions. You can buy the large canister if you plan to cook it a lot or simply buy a single serving to try it and discard the spice sack. You can, of course, cook it in water but, why would you cook anything in water when you can infuse it with broth?
 
Toast the almonds in the oven at 325 degrees for 10-15 minutes until they slightly brown. This will bring out the taste in the nuts. Chop vegetables while these items are cooking and then simply mix together. Fluff and mix with a fork only, you don't want to mash and mangle the couscous. If you aren't serving this right away, toss in 1-2 Tbsp of flavored olive oil to keep it from sticking together.

Friday, March 29, 2013

Hummus Quinoa Cakes

Quinoa is a recent discovery of mine. Hearty and good for the diet, it's a carb that you can feel good about. This recipe will please picky eaters and give them a dose of veggies as well. I used orange peppers in this to give these some beautiful color.
 
1 cup cooked quinoa
3/4 cup hummus
1/2 sliced pepper
3 minced celery stalks
1/2 cup minced onion
2 Tbsp olive oil
1 Tsp garlic powder
 
Recipe Adapted from The Lemon Bowl
 Cook quinoa according to directions. Allow to cool. Dice vegeatables and combine with quinoa and hummus. Heat a frypan over medium heat and then add in the oil. Form quinoa cakes into patties. I found that actually getting your hands in there and dirty and pressing them compactly into balls worked well and then flattening them out in the pan was the best method. Brown them for 3-4 minutes on each side, turning them very gently (sometimes I needed 2 spatulas).
 By the end I had beautiful golden cakes like this!
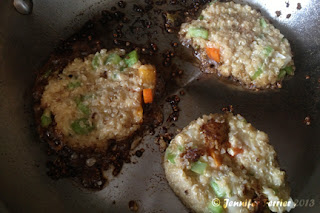
 But my first ones turned out like this and I almost admitted to my first Pinterest fail.
They were still yummy though! I served the good ones to company and ate the broken ones for lunch.
 Hindsight:
A great tip to know is that when the quinoa is browned, it pops (kind of like popcorn). Try to keep the cakes as intact as possible and keep a good distance from the pan when you don't have to turn them.
 
 If one falls apart, scrape it off to the side and get it out of the pan as quickly as you can because it will begin to turn the oil brown.
 
Next time I do this, I think I'm going to try to form the balls ahead of time and refridgerate them for an hour or so before browning. I've used that method with potato, sweet potato, and zucchini patties in the past and it works out well.


Thursday, March 28, 2013

Poached Pears with Mocha Sauce

This is an indulgent fruit dessert that would please the chocolate lover in all of us. I did not core the pears because I wanted the presentation with the stems. If you do choose to core them, be sure to use a good apple corer to do the job as it is fairly impossible to do this with a knife and keep them intact. I have a good Henckels corer that I swear by for applications such as this.
 
2 Bartlett pears
2 cups water
1 Tsp vanilla extract
1 Tbsp cinnamon
1/2 Tsp nutmeg
2 Tbsp brown sugar
1 Tbsp baking cocoa
1 Tsp flour
6 Tbsp milk
1 Tbsp spreadable butter

Recipe Adapted from What 2 Cook
 
Peel pears, leaving the stems intact. Trim a tiny bit of fruit off the bottom, just enough for the pears to sit flat in a saucepan. Add the water, vanilla, cinnamon, and nutmeg and bring to a boil. Once boiling, reduce heat and cover for 35-45 minutes, poaching pears until they are tender. Drain pears and place on dessert plates.

While pears are cooling, combine remaining ingredients in a small saucepan. Bring to a boil over medium heat, stirring constantly. Once boiling, stir constantly while sauce thickens (1-2 minutes) and then drizzle over pears. 


Wednesday, March 27, 2013

Gratineed Mustard Creamed Shallots

This is a great side dish for pork, steak, or chicken. I'm definitely not a mustard fan but these creamy, caramelized onions were a great side dish for me.
 
1 Tbsp Dijon mustard
3 Tbsp Sherry or red cooking wine
shallots (about 1 lb)
2 Tbsp butter
1 Tbsp flour
1/2 cup milk
1/4 Tsp nutmeg
1/2 cup shredded Parmesan cheese
 
Recipe Adapted from Epicurious
Slice shallots into rings and boil in water until tender (approximately 25-30 minutes).
 Drain shallots in a colander and melt the butter in a saucepan. Add flour gradually, being careful to stir constantly to avoid any lumps. Add remaining ingredients (except cheese) and simmer until sauce begins to thicken (8-10 minutes). Add shallots to the sauce and simmer for 5 more minutes. Transfer mixture to a baking dish and top with cheese. Broil mixture until cheese melts and mixture begins to bubble (3-5 minutes).


Tuesday, March 26, 2013

Blueberry Lemon Yogurt Loaf

 Who doesn't love blueberries? ...and I love anything with lemon in it. The greek yogurt makes the loaf in this recipe that uses the poke method of making sure you always get a moist cake. It's great for breakfast or dessert.
 
Loaf:
1 1/2 cups + 1 Tbsp all-purpose flour
2 Tsps baking powder
1/2 Tsp salt
1/2 cup plain Greek yogurt
1 cup sugar
3 large eggs
2 Tsps grated lemon zest
1/2 Tsp vanilla extract
1/2 cup vegetable oil
1 cup blueberries
 
Glaze:
1/3 cup freshly squeezed lemon juice
1/3 cup sugar
1/2 cup plain Greek yogurt
 
Recipe adapted from Sweet Pea's Kitchen
 
Preheat your oven to 350 degrees and grease the bottom and sides of a loaf pan with shortening. Add the 1 Tbsp of flour to the pan and flour the sides, tapping out any excess flour. Sift together the dry ingredients in a large bowl and set aside. In a separate bowl, whisk together the wet ingredients and slowly add the wet mixture to the dry mixture. If using frozen blueberries, thoroughly rinse them in a colander to prevent the loaf from turning purple. Gently fold them into the mixture and pour into the loaf pan. The loaf should bake for 50-55 minutes or until a toothpick comes out clean.
 
Let the loaf cool for 10-15 minutes after it comes out of the oven. Using a knife or toothpick, trace edges of the loaf and place upside down on a paper towel. The loaf should fall out with little help. Completely cool on a wire rack.

While the loaf is cooling, stir together the lemon juice and sugar in a small pot under low heat. Once the mixture begins to boil, stir constantly until the sugar is completely dissolved and the syrup starts to brown. Let the mixture cool. Using the handle of a wooden spoon or large chopsticks, poke holes all over the top of the loaf, about half way deep through it. Once the sugar syrup has cooled, mix in the remaining yogurt and pour over the loaf. Allow it to harden and cool in the fridge.
 
This loaf should be stored in the fridge but, after a few hours, the yogurt glaze will harden and it can travel or sit for a few hours until being served. I personally microwave my slice for about 30 seconds before enjoying it.

Monday, March 25, 2013

Broccoli and Rabe Sausage with Orzo

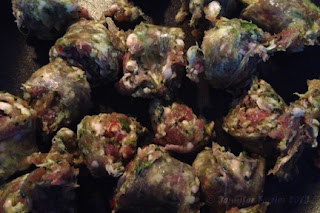
The other day I ran into Stop & Shop to pick up a few things. I really never shop there so I decided to look around a bit. I found this great broccoli and rabe sausage! I mean look at the colors in the photo below, it just looked so good. I searched Pinterest for some inspiration on sausage dishes but didn't come up with much. I actually really didn't even know what rabe was!
 
(räb) A vegetable plant (Brassica rapa) related to the turnip and grown for its pungent leafy shoots. Also called rapini.
 
I sent myself into the kitchen and came up with this little gem that my husband raved about.
1 lb broccoli and rabe sausage
(or really any sausage if you can't find something like this)
1/2 box cooked orzo
1/2 cup white wine or cooking wine
1/4 cup milk
1 Tbsp flour
1 cup chicken or beef broth
1 Tbsp minced garlic
1/4 cup chopped onions
1 Tbsp olive oil
4 cups steamed broccoli
Parmesan cheese (to taste)
Cook orzo to package directions and steam broccoli (I did use a Fresh n' Steam package because it was all I had at the time). Chop up the sausage links into about 1 inch pieces and saute over medium heat until thoroughly cooked, about 5 minutes. Add the chopped onion and garlic.
 
I love cooking with garlic and onions, so I buy minced garlic to keep in the fridge and cut up an onion or two at the beginning of the week and keep it in an onion saver to cook with it.
 
Let the oil from the sausage caramelize the onions a bit and then you can begin to assemble your sauce in the pan. Add the oil and stir and then add in the chicken broth. After a few minutes of simmering, add in the wine.
 
I used a Pinot Grigio, which just happened to be the "3 buck Chuck" from Trader Joe's my husband was working on in the fridge at the moment.
 
The last steps are adding the milk and flour to cream up and thicken your sauce. If you don't trust yourself adding the flour directly to the pan and being able to avoid any lumps, mix it ahead of time in the cold milk and then add them. I cooked this sauce as a reduction so I simmered everything for about 10 more minutes on medium-low and then tossed in the broccoli and the orzo. Add some Parmesan cheese to top this and you have one delicious original meal!
 
 
Hindsight:
(My plan is to add tips to my recipes. I tend to experiment a lot and not usually follow recipes so if I discover something along the way in writing these, I'll share the tips here.)

My husband likes everything with "light sauce", so I tend to cook that way. If I make this dish again, I'd like it a bit saucier. I'd up the recipe on everything in the sauce by 50% so you might consider doing that.


Friday, March 22, 2013

Maple Glazed Porkchops

I've been making these porkchops since my husband and I celebrated our 5 year wedding anniversary in Vermont. We took a tour (literally the owner walking us around and showing us his farm) of a maple farm and brought back goodies that I still use cooking and baking. If you ever visit Goodrich's Maple Farm in Cabot, you'll want to pick yourself up some pure maple syrup, maple sugar for baking, and maple cream for spreading onto anything you want to taste heavenly. Their website is certainly worth ordering from if you won't be up there in the near future.
 
2 porkchops
1 Tbsp BBQ sauce (I prefer Sweet Baby Ray's)
2 Tsp ground coffee
3 Tbsp pure maple syrup
I added all of the ingredients to the porkchops for photographic purposes but, I would suggest mixing them all in a bowl and then applying them to both sides of chops with a basting brush. Be sure to use all of the sauce as a marinade and don't save any for dipping. Coffee grounds are far less appealing in a raw sauce and you don't want to cross-contaminate your meat. Cook chops in a 425 degree oven for 20 minutes, or until a meat thermometer reads 140 degrees.
 

Wednesday, March 20, 2013

Blog Introduction

As an introduction to this blog, I guess I should inform my readers about me, in case you already don't know me. I'm a married 30 year old, so-far child-less woman, living on an island by the sea. I'm a commercial photographer by trade and a domestic diva by hobby.

My friends all enjoy coming to parties at my house because they know they will get a ton of homemade food...no matter what I may say in an invite. I believe in basically not using pre-fab and processed foods. I'm Greek, which means that there will always be a LOT of whatever I make. When we bought our house, I knew a full-size deep freeze was going into our basement. I'm all about freezing anything I can, to use on a night or event when I have no time to put in the effort. I enjoy experimenting with sometimes complicated recipes so my mindset is "why make one when I can make six?". About two years ago, my friend, Becky went into great detail with me on how to best freeze cookies and well, that basically turned a whole new dimension on my baking. Then, my friend, Amy turned me onto Bakerella and the world of cakepops was opened to me. I also took some cake decorating classes. Since then I have developed a passion for candy making and my freezer has never been the same. Being the crazy obsessive/compulsive person I am, my freezer now has a complete inventory log on it! (Yes, I know I'm insane.)

 
So, you probably want to know what you will find here. Great recipes, for one. New ideas and twists on old favorites will be included as well. I discovered the great wide world of Pinterest and now I'm so hooked on cooking that I decided I wanted to create this blog in the first place. That link is to MY Pinterest boards, so you might get an idea of recipes to come by looking at it. I don't really know how far I'm going to go with giving out my "secrets" yet, so to my friends maybe salivating about getting my lamb recipe, don't get your hopes up just yet. I am a professional photographer, so the photo aspect of this will be a learning process. I do a lot of cooking at other people's houses too so I'm not going to be lugging my Nikon and all my equipment with me wherever I go. For now, I don't want this to be "work". Documentary styling, was also never really my thing. So, the photos will show you important prep details. They will be in focus, color correct, correctly exposed, somewhat visually pleasing, (oh and copyrighted) but don't expect art from probably my IPhone. Anyone wanting to see that can visit my website. Again, this may improve as the blog grows. Also, please don't judge my blogging or web design abilities at this time because I know nothing about Blogger at this current moment. Lastly, thank you to my friend, Jen, with a great blog, that gave me advice on all of this. I promise this is the last "rant" you will see here.

I hope you will be back to steal some great recipes from me! Subscribe, pin away, and tell your friends. Thanks for reading!