Showing posts with label sides. Show all posts

Wednesday, November 6, 2013

Mini Stuffed Peppers

I came across a bag of these wonderful, colorful peppers while grocery shopping the other day and I knew I needed to make something out of them. 
I cooked up some jasmine rice and long grain rice in chicken broth instead of water, to add extra flavor. Then I added some tomato sauce and Italian seasoning and stuffed the peppers to the top. 
I stacked them tightly into a small casserole dish and topped with some shredded cheese. I baked them in a 350 degree oven for about 45 minutes. I only served a couple as a side to my dinner. The rest got gently separated a bit and I placed the whole dish in the freezer for a few hours until they froze slightly. Then I threw them all into a freezer bag and now I have a side that I can pull out anytime for dinner. 
Hindsight:
These would be great with some ground beef added to them. That's the way I usually make stuffed peppers but I wanted a side to go with anything since I was going to use the predominantly for freezing. Trader Joe's has a great blend that I love to use called Harvest Grains that would be wonderful for this as well. It's a hearty mix of couscous, quinoa, rice, buckwheat, and rice. I highly suggest trying that. 

Monday, July 22, 2013

Brazilian Stuffing

My husband and I loved a Brazilian restaurant that closed down in Peabody a few years back. Everything there was amazing and we were completely devastated. None of the other Brazilian rodizios we have tried since have been able to hold a candle to it. I absolutely loved the stuffing that they served!

I'm not a big fan of beans at all. I'm not sure how it is that I totally love this dish! My recipe is purely trial and error until I achieved a similar taste. I have no idea if it's culturally authentic, so please don't hold that against me. 

2 eggs, beaten
1 medium white onion, minced
1 package chorizo, sliced
1 bunch fresh cilantro
1 can kidney beans
Seasoned breadcrumbs
1/2 cup beef or chicken broth
1 Tsp butter spread

In a skillet, melt butter. Add onions and saute until they begin to caramelize (10 minutes). Turn the heat up to high and add the beaten eggs. Quickly and constantly stir the eggs with a spatula until cooked. Add the broth. Bring to a boil. Once boiling, add the sausage. The sausage I use is pre-cooked so I'm just warming it up. 

Drain and rinse the kidney beans. Remove skillet from heat and add the beans. Mix well. Chop the cilantro into small pieces and add to skillet. Stirring constantly, begin to add the breadcrumbs. I usually end up using about 2 cups in total. You want to soak up all the liquid, coat all the items, but not have dry breadcrumbs in excess inside your pan. Knowing the consistency you want isn't necessarily the easiest thing. It's really just trial and error. 

I've had stuffing at other Brazilian BBQs that have been different. Some are much drier versions using much more breadcrumbs. Some have vegetables mixed in such as carrots, corn, peas, of green beans. The recipe above is my favorite take on it. Feel free to add items to your liking. 

Saturday, July 20, 2013

Rice Pilaf

This is my go-to easy rice pilaf recipe. It's a staple on my Easter table and its easy to prep ahead of time. 

1/2 box orzo pasta
2 cups dry rice
1 can chicken broth
1/2 cup sliced almonds
2 Tbsp butter
salt

Toast the sliced almonds in a 350 degree oven for 10-15 minutes until they begin to brown. Set aside to cool. 

Bring a large pot of salted water to a boil on the stove top. Add dry rice and cook according to package directions (usually about 30 minutes). During the last 10 minutes of cooking, add the orzo and stir thoroughly. Once cooked properly, drain the mixture. Add the butter to the warm pan and let it melt. Once melted, stir in rice, orzo, and almonds until well mixed. Add the chicken broth and continue mixing. 

The rice may be refrigerated for later use in the day or the following day. When ready to finish the dish, bake in a 350 degree oven until warm, stirring occasionally (20-30 minutes). 

Friday, July 19, 2013

Roasted Broccolini

I love the tender delicacy of broccolini as an alternative to broccoli. It can be prepared a number of ways, but my favorite is simply steaming it and finishing it with a signature sauce made with butter, garlic, and lemon. 
2-3 garlic cloves
1 1/2 Tbsp butter
1 Tbsp lemon juice
1/8 Tsp lemon pepper
1/2 Tsp onion powder
zest of 1/2 a lemon
1/4 Tsp cornstarch
Melt the butter over low heat in a small saucepan. Finely mince garlic cloves and add to the pan. Cook until fragrant. Add remaining ingredients and mix thoroughly. Simmer for 2-3 minutes and then sprinkle in cornstarch, stirring constantly to avoid lumps. Pour immediately over vegetables. 

Tuesday, July 9, 2013

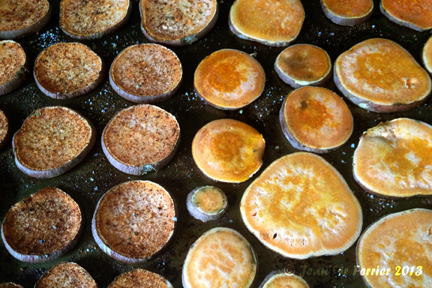
Baked Sweet Potato Chips

After making Addictive Baked Potato Chips, I was eyeing sweet potatoes and figured I would give them a try with a sweet twist. I made them in the same manner as the regular potatoes with different spices that gave them a lovely fall flavor.
sweet potatoes
mixed up salt
cinnamon
nutmeg
vanilla extract
olive oil

Scrub your sweet potatoes with a brush under running water. Slice them the short way by hand or using a mandolin. I cut mine in about 1/4 inch strips. Pour some olive oil and a bit of vanilla extract on a baking sheet and rub around with a paper towel to spread evenly. Cover the baking sheet with sweet potatoes and then season. I used a moderate amount of cinnamon and just a bit of nutmeg. Bake in a 350 degree oven for 10 minutes. Then, pull them out of the oven, flip them, and bake for an additional 10 minutes. These were pretty consistent in the cooking and texture. Sweet potatoes are naturally more dense than regular potatoes so, they cook up more like a vegetable and don't get as chewy as a texture. That's why I chose to cut down on the cooking time from the regular recipe.


Monday, June 17, 2013

Roasted Chick Peas

I am absolutely in love with hummus! I had such a hummus addiction at one point that my husband said I needed to go to meetings and seek a 12 step program! Although I have yet to make my own, I did come across tons of pins for roasted chick peas on Pinterest and decided I had to try this!
 
They certainly aren't your average, normal snack but I liked the taste and texture of these. Not to forget that they are filling and much healthier than most snack finger foods. They are a great thing to make for toddlers who are just getting used to small foods and so much better than store bought snacks.
 
There really isn't a limit to what you can put on these chick peas! You can try a barbecue rub; go sweet with brown sugars, cinnamon, and honey; try an Asian style with soy and sesame seeds; add some spice with cayenne pepper; anything you can think of to try! My favorite that I've tried is below.
 
1 can of garbanzo beans, drained
 1 Tbsp onion powder
1 Tbsp garlic powder
 1/2 Tsp fresh rosemary
 
The blog that I adapted this from, Foy Update, had a whole cooking time scale for these. I didn't want a complex recipe for something that I thought you should be able to just mix up and forget. So, I drained mine and didn't additionally rinse them, mixed them up with the seasonings, and baked at 400 for a little over an hour and stirred them about 4 times during the roasting. I did find that I liked them more well done and dried out but, a few were still a bit soft in the center and that was fine with me too!


Tuesday, June 11, 2013

Sweet Corn Tomalito

Chevy's was one of my husband's favorite Mexican restaurants. When they all closed down, I bought the restaurant's cookbook to try and make him some dishes. 

The first time, I made him a huge sampler platter for Valentines Day. This was back 9 years ago when clearly out relationship was still new and I gladly spent 8 hours in the kitchen cooking something special for him. Now, I just cook a few dishes from time to time, like this one, that he loves. 

This is a great side for almost anything. I usually serve it on Thanksgiving or Christmas. It's not hard to make, it's just time consuming. 

You can prepare this ahead of time and cook it later. It freezes well in a Ziploc freezer bag. Just portion it out and then lay the bag flat and expel any air. Defrosts in the fridge overnight or on the counter in about an hour. Don't try to can or jar this! I'm huge on jarring things and this one was a big mistake! The cornmeal expands and will explode everything everywhere. What a mess that was!
 
6 cups drained corn kernels
¾ cup milk
¼ cup melted butter
2/3 cup sugar
¾ cup cornmeal
¾ Tsp baking powder
¾ Tsp salt
¼ cup milk
Preheat oven to 250 degrees. Blend 3 cups of the corn kernels and the ¾ cup of milk in the blender. Add butter and sugar until smooth (2 minutes). Grind remaining corn kernels slightly in food processor and mix corn mixtures together with remaining ingredients. Pour into a baking pan and cover with aluminum foil. Set inside larger baking pan and fill ¾ of the way up with water. Place in oven and cook for 1 ½-2 hrs until hot. Scoop out pudding portions.

Sunday, June 2, 2013

Roasted Broccoli

If you check out recipes on Pinterest, you probably have come across this pin. Labeled with things such as "Best Broccoli Ever", I had to try it. Then I saw it! 5-6 Tbsp of oil?!? I don't think so! What's the point of that?
 
Here's a trick! Get a large gallon Ziploc bag, and coat the broccoli in oil in that! It will evenly coat and you won't clog your arteries with massive amounts of oil while trying to eat a vegetable!
 
1 large head of broccoli, cut
2 Tbsp olive oil
1 Tsp mixed up salt
1/2 tsp mixed up pepper
2 garlic cloves, minced
1/3 cup Parmesan cheese
zest and juice from 1 lemon
Recipe Adapted from The Gingered Whisk
 
Using the above Ziploc bag method, mix broccoli with oil and garlic. Lay out on a cookie sheet lined with parchment paper and sprinkle with mixed up salt and pepper. Roast in a 425 degree oven for 20-25 minutes. Remove from the oven and toss to mix it up. Squeeze the lemon juice on top and then disperse the lemon zest evenly over broccoli. Sprinkle evenly with the Parmesan cheese. Roast an additional 2-3 minutes, until fragrant.


Saturday, June 1, 2013

Broccoli Bites

Broccoli Bites, ordered in a sub shop, you are going to get a fried bite of deliciousness. But, it's deep fried and pretty much kills any good you are doing by eating the broccoli! I adapted this recipe from one that used shredded cheese. The cheese slices make for a deeper, more layered taste and it also gives them this lovely golden brown color. They have all the taste of those fried appetizers but, none of the grease. Originally made as a healthy finger food for kids, this can be served as a dinner side or a great party appetizer. They are so easy to make, too!
 
1 large head of broccoli
2 slices American cheese
1 slice Swiss cheese
2 eggs
1 Tbsp minced onion
1 Tsp garlic powder
salt & pepper, to taste
1 cup breadcrumbs
 
Recipe Adapted from Stacey Snacks
In a steamer pan, steam your fresh broccoli until tender. Allow it to cool off enough to handle.
Combine other ingredients in a large mixing bowl.
Mix in your broccoli.
Using a tablespoon, spoon out round balls of the mix and flatten them onto a baking sheet lined with parchment paper.
In a 375 degree oven, bake for 15 minutes. Flip the bites and bake for an additional 10 minutes.
These just look so good! Anyone would certainly love them, even kids!


Friday, May 31, 2013

Pancetta Asparagus

Who doesn't love pancetta? Maybe not the price tag! But, it's a salted meat that is a gourmet substitute for bacon. Just try to keep telling yourself that the vegetables you are eating equal that part out!
 
2 oz pancetta, diced
1 Tbsp spreadable butter
1 lb fresh asparagus, ends trimmed off
2 cloves garlic, minced
squirt of lemon juice
1 Tbsp lemon zest
1 Tsp orange zest
2 Tbsp fresh parsley, chopped
pepper, to taste
 
Recipe Adapted from Food 52
 
Cut asparagus into one inch pieces, diagonally. In a large skillet, saute pancetta until golden. Add the butter to the pan and, once melted, add asparagus.
Cover and let it steam on medium low for 3-4 minutes. Then, mix in the remaining ingredients and cook for an additional 1-2 minutes.

Wednesday, May 29, 2013

Mashed Cauliflower

I was so happy when restaurants started serving this as an alternative to mashed potatoes. Sadly, as the Atkins craze started to fizzle, most restaurants pulled the side from their menus. I still like to make it though, and have gotten a few people hooked on it. 

The key to this dish is to give it enough spice that it isn't bland. I've tried all kinds of different cheeses in this dish and never had it turn out bad. Feel free to try anything from American cheese slices to diet powdered "Cheese Buds". 

1 medium head cauliflower
1Tbsp garlic powder
1 Tbsp onion powder
1/2 cup shredded cheese
2 Tbsp spreadable butter

Cut cauliflower into bite sized pieces and boil in a pot of salted water until tender (20-25 minutes). I find that the longer it boils, the better. Drain the cauliflower well in a colander. Transfer to a stand mixer or bowl to mix it with a hand mixer. Add remaining ingredients and mix well. 

You can freeze this side dish in freezer bags and defrost on the counter in about an hour or overnight in the fridge. The photo above is defrosted from my freezer, which is why it appears a bit runny. Heat it back up in the oven and give it a good stir, and it will be good as new. 


Saturday, May 25, 2013

Rosemary Infused Potatoes

A few years ago I added rosemary to my signature Greek potatoes. I used to just season them and cook them with my lamb or whatever meat I was cooking. Then I discovered browning them first. 
 
I heat up some olive oil in a large nonstick skillet and throw in tons of rosemary (fresh or dried). Then scrub red bliss potatoes under water and cut into bite sized pieces. Season with mixed up pepper. CAREFULLY, add the potatoes to the skillet. The water on the potatoes will cause the oil to splash up so be safe not to get burned. Brown the potatoes, heating them on medium high. Flip them a few times to brown easily on all sides. Do not cook them all the way through, you are just searing them. 
Then empty them into a casserole dish or the bottom of your roasting pan if you will place meat on top of them to cook.
 
I cooked a leg of lamb on top of them. (No, I'm not sharing that recipe!)
Add a package of Lipton onion soup mix and 2 cloves of minced garlic. Sprinkle generously with Italian seasoning and 1/8 Tsp lemon pepper. Fill the pan with about 1/4 inch of water. Add your meat if desired and cook meat according to recipe, or if you are cooking just the potatoes, bake for about 45 minutes in a 375 degree oven until tender. 


Wednesday, May 22, 2013

Pesto Potato Salad

This recipe is pretty easy but, gets rave reviews nonetheless. In fact, my friend Tanya texts me every so often asking when I'll be making it again. It's my signature, go-to potato salad recipe for cookouts. 

I always add things into tuna, chicken, or potato salad to cut down on the mayo intake. Plain Greek yogurt is great for this! I've even used sour cream in some instances because who wants to add like 500 calories worth of mayo to a recipe?

I usually make a very large portion of this with a 5lb bag of potatoes. I scaled this down a bit. 

4-6 red bliss potatoes
1 cup plain Greek yogurt
1 1/2 Tbsp Mayonnaise
2 Tbsp Pesto Sauce
2 Tbsp bacon bits

Scrub the potatoes under water and cut into bite sized pieces. Add to a pot of well salted water and bring to a boil. Cook until the potatoes are tender, about 15 minutes. Drain and rinse under cold water until cool. 
In a large bowl, combine all other ingredients. Mix in potatoes well, using a smaller mixing spoon. 

Saturday, May 18, 2013

Addictive Baked Potato Chips

I love homemade chips. I absolutely love them at our local restaurant, The Windward. If I can make them baked and not fried at home, I would be very excited.

I made these as a dinner side. They are really dangerous! If you leave them out on your counter, there may not be any left for your dinner, if you have to keep walking by them. 
baking russet potatoes
mixed up salt
mixed up pepper
garlic powder
your favorite olive oil
(I used a rosemary oregano one)
 
Recipe Adapted from Oprah
 
Scrub your potatoes with a brush under running water. Slice them the long way by hand or using a mandolin. I cut mine in about 1/4 inch strips. 
Pour some olive oil on a baking sheet and rub around with a paper towel to spread evenly. Cover the baking sheet with potatoes and then season to your liking. Bake in a 350 degree oven for 15 minutes. Then, pull them out of the oven, flip them, and bake for an additional 10 minutes.
Personally, I loved the inconsistencies in how these came out. I couldn't decide if I liked the smaller harder ones better or the ones that were still a bit soft. If you make your decision on that and want them to come out more uniform the next time you make them, just keep the smaller ones in the middle of the sheet and the larger ones towards the outside when baking them. 
These certainly didn't need anything to go with them but I did make a dipping sauce out of:
1 cup plain Greek yogurt
1/2 packet Ranch
1/4 packet of green onion mix or
1 Tbsp onion dip seasoning

Try to make enough to stare with your friends! Go ahead and leave them in a spot you have to walk by during the day. I dare you.

Friday, May 17, 2013

Stuffed Artichokes

I think a lot of people don't try to eat or make full artichokes because they can look very intimidating. They are actually fairly easy to make and taste great made with almost any stuffing. Those artichoke hearts that they sell pickled in a grocery store, not even the best part! And spinach artichoke dip is surely mostly spinach everywhere you go. Give them a try. You really can't mess these up unless you let the water boil away too much while they are steaming and burn your pan. 

I learned all about artichokes at a young age from my Auntie Linda. We made them sometimes for Sunday dinners. The only other friend I have known brave enough to make them was my friend Chris and the ones he made us were super deadly! They were oh so good and stuffed with sausage, cheese, and everything but the kitchen sink but, oh did our stomachs take a beating after that! That was quite the interesting night and ride home. So I never tried them that way!
You really can use any seasonings you like but here's what I use:
oregano
basil
parsley
garlic, minced
onion, minced
breadcrumbs
Parmesan cheese
bacon bits
topping of some shredded cheese blend
First, cut the stem off. Cut both ends off that and then stand it up and cut the sides off, squaring on four sides and trim off anything else that is still the outside of the stem. 

Next, cut the artichoke bottom so it will sit flat. Pull off and discard any leaves on the bottom that are looking black or damaged. Then, with kitchen shears, cut the pointy tips off each leaf, working your way around the vegetable. Gently pull the leaves away from the center the higher you get to the top. When you've gone almost to the top and all the leftover leaves are fairly even and tight, lay it on its side and lop off the top. 

Gently pull it out from the center until all the leaves are feathered out. Then, run it under water and fill it up a few times with water and drain. Not only are you cleaning the vegetable, but the water will help the seasonings stick. 

Mix the seasonings to your taste in a small bowl. Spoon it over the artichoke and make sure you get something between all the leaves, paying closer attention to the outsides. 
Lay them in a pot with a lid, standing up and throw in the stems. Fill the pot with about an inch of water (you could also try a broth).
 
Bring to a boil and then reduce heat and cover, steaming for about 45 minutes to an hour. Check to make sure water has not boiled away periodically and add more if needed.
When an outside leaf pulls off easily, cover with the shredded cheese and steam 5 minutes more. 

Now to eat them! Basically, you are scraping the "meat" off the leaves with your teeth. I find it's easier to position the inside facing side of a leaf upside down and pull in with my bottom teeth, but you'll figure it out. You can eat all the leaves this way. As you get closer to the inside, they get softer. When you come to a prickly center bottom, STOP! Scoop this out with a spoon and discard, it's pretty nasty. Under that is the heart and it should be very flavorful if you were good at seasoning. You can cut this up and enjoy it along with the stem. 

Once you make and eat these once, you will get the hang of it, I promise.