Thursday, July 25, 2013

Monte Cristos

 If you've never had a monte cristo, I'm afraid you are missing out. I am not a person who mixes foods at all. If they made separated plates in fine china, I would own them. This is one of these dishes that "it's ok because someone else did it and it's accepted". That's my story and I'm sticking to it. 

A monte cristo is basically a sandwich made of ham, turkey, and various cheeses that is coated in a pancake like batter, pan fried, and served with a fruit jelly! This would surely wow any brunch guest. You can serve them cold as well but, they are better warm and melty. 
The first batch, I made for some guests and used leftover hamburger buns. Traditionally, it's made with bread and there is an extra piece in the middle, kind of like a Big Mac. I preferred the thickness of hamburger buns. The second time I did it (above), I used some cinnamon raisin bread. Use your creativity because mostly anything can go here. The only thing I wouldn't do is use condiments on the sandwiches. 
Layer the cheese closest to each slice of bread. I used cheddar and American but, again use Swiss, Monterrey Jack...whatever you like. Then layer turkey and ham on each side and close the sandwich. Press down hard on each sandwich to squish it. Then stack them and press down hard again to get them nice and thin. 
They should be refrigerated as long as possible. It's best to assemble the sandwiches the day before if you can! This helps seal them together. 
When you are ready to fry them up, heat up a nonstick skillet on low. The popular way to cook these is to use oil and fry them but I just can't cook like that. A bit of spreadable butter will do well pan frying them for me. 

Mix up a pancake like batter. This is what I use:
1/2 cup flour
3/4 Tsp baking powder
1/8 Tsp salt
1 Tbsp sugar
1 egg
1/2 cup milk
2 Tsp vegetable oil

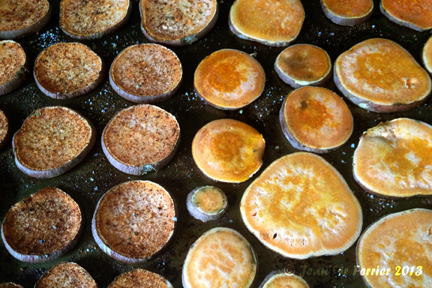
Your batter should be runny, so you want to thin it out with water or milk. It should coat the sandwiches without allowing you to see the meat and cheese but not be as thick as batter. Then, carefully dip the sandwiches and fry them for 2-3 minutes on each side until brown. 
While still hot, dust them with some sifted powdered sugar. They are mostly served dipped in raspberry jam, but strawberry or blackberry work as well. Enjoy the eewy gooey breakfast goodness!

Wednesday, July 24, 2013

Pesto Pine Nut Spaghetti Squash

I'm sure it comes as no surprise that I love spaghetti squash, if you follow my blog. Cook the squash according to my directions here. Then, mix the squash with your favorite pesto sauce. I made some with fresh herbs from my garden. 
You can use whatever you grow: oregano, parsley, basil, cilantro...and mix it up with minced garlic, olive oil, and Parmesan cheese in a food processor until you have a thin paste. You can add spinach or arugula as well. Either add the sauce and mix into the squash or do it in a separate bowl and then scoop it back into the squash to make a bowl. Top with pine nuts, some shredded or Parmesan cheese, and bake in a 350 degree oven for 10-15 minutes, until cheese is melted.
 
Recipe Adapted from Delightful Country Cookin

Tuesday, July 23, 2013

Citrus Roasted Chicken

This whole chicken recipe is wonderful for a spring or summer evening. Just don't cook it on a really hot day when you don't want to keep your oven running for hours. You can serve it with anything and cook veggies right under the chicken. I threw in potatoes and carrots. 

Take an oven stuffer roaster and pull out the innards. Trim any excess fat or skin that you wish and place in a roasting pan. Pour 1 Tbsp of honey over it and rub in. Zest 1/2 a lemon and 1 orange over the chicken, spreading it around. Squeeze the half lemon over it, then juice the full orange over it as well. Place the oranges inside the cavity. Sprinkle with 1 Tsp garlic powder and 1/2 Tsp onion powder, 1/2 Tsp sage, and 1/2 Tsp thyme. Top with fresh cuts of rosemary and a dusting of sesame seeds. 

Roast according to package directions depending on the weight of your chicken.  You don't need to add any water to the pan, but if you are worried, you can add 1/4 inch of chicken broth to the pan if you like veggies more tender than crispy. The juices will give the vegetables a great taste but you might want to melt some butter over them when you are done cooking them. 

Monday, July 22, 2013

Brazilian Stuffing

My husband and I loved a Brazilian restaurant that closed down in Peabody a few years back. Everything there was amazing and we were completely devastated. None of the other Brazilian rodizios we have tried since have been able to hold a candle to it. I absolutely loved the stuffing that they served!

I'm not a big fan of beans at all. I'm not sure how it is that I totally love this dish! My recipe is purely trial and error until I achieved a similar taste. I have no idea if it's culturally authentic, so please don't hold that against me. 

2 eggs, beaten
1 medium white onion, minced
1 package chorizo, sliced
1 bunch fresh cilantro
1 can kidney beans
Seasoned breadcrumbs
1/2 cup beef or chicken broth
1 Tsp butter spread

In a skillet, melt butter. Add onions and saute until they begin to caramelize (10 minutes). Turn the heat up to high and add the beaten eggs. Quickly and constantly stir the eggs with a spatula until cooked. Add the broth. Bring to a boil. Once boiling, add the sausage. The sausage I use is pre-cooked so I'm just warming it up. 

Drain and rinse the kidney beans. Remove skillet from heat and add the beans. Mix well. Chop the cilantro into small pieces and add to skillet. Stirring constantly, begin to add the breadcrumbs. I usually end up using about 2 cups in total. You want to soak up all the liquid, coat all the items, but not have dry breadcrumbs in excess inside your pan. Knowing the consistency you want isn't necessarily the easiest thing. It's really just trial and error. 

I've had stuffing at other Brazilian BBQs that have been different. Some are much drier versions using much more breadcrumbs. Some have vegetables mixed in such as carrots, corn, peas, of green beans. The recipe above is my favorite take on it. Feel free to add items to your liking. 

Saturday, July 20, 2013

Rice Pilaf

This is my go-to easy rice pilaf recipe. It's a staple on my Easter table and its easy to prep ahead of time. 

1/2 box orzo pasta
2 cups dry rice
1 can chicken broth
1/2 cup sliced almonds
2 Tbsp butter
salt

Toast the sliced almonds in a 350 degree oven for 10-15 minutes until they begin to brown. Set aside to cool. 

Bring a large pot of salted water to a boil on the stove top. Add dry rice and cook according to package directions (usually about 30 minutes). During the last 10 minutes of cooking, add the orzo and stir thoroughly. Once cooked properly, drain the mixture. Add the butter to the warm pan and let it melt. Once melted, stir in rice, orzo, and almonds until well mixed. Add the chicken broth and continue mixing. 

The rice may be refrigerated for later use in the day or the following day. When ready to finish the dish, bake in a 350 degree oven until warm, stirring occasionally (20-30 minutes). 

Friday, July 19, 2013

Roasted Broccolini

I love the tender delicacy of broccolini as an alternative to broccoli. It can be prepared a number of ways, but my favorite is simply steaming it and finishing it with a signature sauce made with butter, garlic, and lemon. 
2-3 garlic cloves
1 1/2 Tbsp butter
1 Tbsp lemon juice
1/8 Tsp lemon pepper
1/2 Tsp onion powder
zest of 1/2 a lemon
1/4 Tsp cornstarch
Melt the butter over low heat in a small saucepan. Finely mince garlic cloves and add to the pan. Cook until fragrant. Add remaining ingredients and mix thoroughly. Simmer for 2-3 minutes and then sprinkle in cornstarch, stirring constantly to avoid lumps. Pour immediately over vegetables. 

Tuesday, July 9, 2013

Baked Sweet Potato Chips

After making Addictive Baked Potato Chips, I was eyeing sweet potatoes and figured I would give them a try with a sweet twist. I made them in the same manner as the regular potatoes with different spices that gave them a lovely fall flavor.
sweet potatoes
mixed up salt
cinnamon
nutmeg
vanilla extract
olive oil

Scrub your sweet potatoes with a brush under running water. Slice them the short way by hand or using a mandolin. I cut mine in about 1/4 inch strips. Pour some olive oil and a bit of vanilla extract on a baking sheet and rub around with a paper towel to spread evenly. Cover the baking sheet with sweet potatoes and then season. I used a moderate amount of cinnamon and just a bit of nutmeg. Bake in a 350 degree oven for 10 minutes. Then, pull them out of the oven, flip them, and bake for an additional 10 minutes. These were pretty consistent in the cooking and texture. Sweet potatoes are naturally more dense than regular potatoes so, they cook up more like a vegetable and don't get as chewy as a texture. That's why I chose to cut down on the cooking time from the regular recipe.


Monday, July 8, 2013

BLT Pizza

Continuing my homage to the unusual pizzas of the past at California Pizza Kitchen, and I am recreating my favorite discontinued pizzas at home.
I started by prepping a whole wheat dough. It was frozen, so I let it defrost and proof on my counter for several hours before touching it. Then I cleaned the surface I would be working on, made sure it was dry, and poured down some cornmeal. When stretching the dough out, you'll want to use that or semolina, which is more expensive. Coat both sides and ensure that your ball is pretty round. Then stretch it out a bit, flipping it a few times to coat and sticky parts with corneal. Stretch the dough with your fingers and slide the dough in a clockwise, circular motion, keeping your palm off the middle. Keep stretching until you have a fairly good size dough. Then gently pick up the dough and shake off excess cornmeal. Lay down in a pizza pan or on a pizza stone. Preheat your oven to 500 degrees.
 
Start with spreading about 2 cups of mozzarella cheese onto the crust, paying more attention to the edges, because everything will pool to the center.
Then I added 3 broken up strips of lightly cooked bacon. This pizza is great warm or cold but you should make the decision now how you plan to eat it. If you want to eat it cold, dice up some cherry tomatoes and spread those on as well and then top with a sprinkling of Italian seasoning over the pizza and bake. If you want to eat it warm, right away, I would bake it first and then add the tomatoes. Pizza should bake for 8 minutes. When it comes out of the oven, top evenly with some shredded lettuce. Then, using a pastry bag with a small tip or a Ziploc bag with a small slit cut into it, pipe out some ribbons of mayo on top.
Cut into six or eight slices, twisting your wrist at the end of each pizza slice with the cutter to ensure that the slices separate.

Saturday, July 6, 2013

Margarita Cupcakes

This year, Greek Easter and Cinco de Mayo were a shared holiday! I decided to make it fun and we added some Mexican twists to our usual Greek meal. We served everything from hollow chocolate bunnies filled with Tequila Sunrise, courtesy of my friend Betsy, to these little gems. 
And they were certainly that! Let me say, for the record, that I am NOT a margarita person! I'm also not crazy about cakes or cupcakes at all. But these were amazing! Bring them to any adult party and you will have people loving you! The only downside to them was that it was tough to explain to my 4 year old goddaughter why they were off limits to her. 
 
 
1 1/2 cups flour
1 1/2 tsp baking powder
1/4 teaspoon salt
1/2 cup butter
1 cup sugar
2 eggs, beaten
zest and juice of 2 limes
2 Tbsp tequila
1 Tsp vanilla extract
1/2 cup milk
 
Recipe Adapted from Brown Eyed Baker
Preheat oven to 350 degrees. In a mixer, add the butter and cream until softened or use a hand mixer in a large bowl. Add the eggs, zest, juice, tequila, and vanilla. With the mixer on, add the baking powder, salt, sugar, flour, and then milk. Once the oven is heated, turn it down to 325 degrees. Line a muffin pan with paper liners and once the mix is mixed thoroughly, fill liners 1/2 to 3/4 full, disperse amongst about a dozen liners. Bake for 20-25 minutes.
Let the cupcakes cool for 5-10 minutes and then brush with extra tequila. Meanwhile, prepare frosting.
 
1 cup shortening
3 cups powdered sugar
1 Tbsp lime juice
2 Tbsp tequila
pinch of kosher salt
green food coloring
 
Frost cupcakes with a pastry bag. Zest another lime over the frosted cupcakes. Garnish with small peel-on lime slices.
 

Friday, July 5, 2013

Crockpot Jambalaya

They have this great Jambalaya at a popular restaurant, Border Cafe, in my hometown. The place is always packed, there is always a wait, and it's incredibly loud. I'm not in love with the restaurant but I do enjoy their seafood tacos and always order a side of Jambalaya. Now, that's not exactly easy to find in New England. The restaurant is more Tex-Mex than it is Mexican, but most people don't seem to know the difference. 

Jambalaya is a good thing to cook if you have a bunch of leftovers or you are cooking for a crowd. Basically any meat goes, with the staples being sausage and shrimp. You can add beef, chicken, pork, or really anything you see fit. As you can see, it's not exactly easy to make in small portions. I find that if I'm portioning out large packs of chicken, beef, and such and I have an uneven amount to freeze, that becomes my Jambalaya meat. 

I definitely liked that you can make this in a crockpot. I'll tell you a few things that you have to be REALLY careful about...adding the shrimp and the rice. Small salad shrimp like this, that I chose so I didn't have to deal with tails, cook so fast! Add them right before you are going to serve this and barely cook them. Second, don't ever use sushi rice! I did the first time and it was awful. Jambalaya mush! I would say that I don't really agree with cooking that in the crockpot. Rice takes less than a half an hour to cook and I'd rather take that time cooking it on the stove and ensure it's just al dente than to add it to my dish and chance ruining a meal with a bunch of expensive meats in it that cooked all day!
As for the rest of it, just toss it all in the crockpot and cook on low for 5-6 hours or high for 2-3 hours.
 
3 links of sausage, sliced
1 lb boneless, skinless chicken thighs, diced
1/2 lb beef chuck, diced
1 yellow onion, chopped
3 stalks of celery, minced
1 medium red pepper, diced
1 medium yellow pepper, diced
1 can diced tomatoes
2 garlic cloves, minced
1 1/2 cups chicken broth
1 cup beef broth
1/2 cup tomato soup
1 Tbsp oregano
1 Tsp cayenne pepper
1 Tsp Old Bay seasoning
1/2 Tsp thyme

1 package or can of salad shrimp
2 cups of cooked rice

Recipe Adapted from My Recipes


Thursday, July 4, 2013

Greek Filled Chocolates

I developed this urge to make homemade candies a few years back and I can't even surely say where it came from. These types of cups are the most time consuming to make because they are done in layers and cooled in the freezer in between. I wanted to make some different candies for Greek Easter. I used white chocolate dyed a deep red, just like my eggs to mark them apart from other ones I have made. 
Basically, you mix the chocolate molds with some shortening or oil and let it heat up in a double boiler. Don't try to do this in a regular pan! Stir frequently until you have a smooth consistency that just barely starts to slide easily off a spoon. If you haven't worked with melts before, don't start with white chocolate. If you cook white chocolate too much, it will gum up really fast so I would start with a milk chocolate. You can color them whichever color you like. Most directions say to avoid water based coloring but I have honestly never had a problem with them because of the small amount used. If you are a newbie, the gel colors should be easier for you. All you do is put a small amount into your food with a tooth pick.
Once your chocolate is melted, you can either paint it onto the mold bottom and up the sides with a plastic bristled brush (thin coat) or pipe it in using a squeeze bottle and just touch up with the brush (thick coats). Then pop into the freezer for 5-10 minutes until hardened. The more oil or shortening you used, the longer it will take to harden.

Then take them out of the freezer and fill with your filling, leaving space at the top to seal. Put the molds back in the freezer to dry out. This timing will depend on whichever filling you picked. It doesn't have to be hardened, just not tacky before you seal them up. Then fill the rest up with the chocolate. Make sure the sides and top are touching chocolate on chocolate or your candies will leak. Then, lay flat in the freezer for about 15-20 minutes until they are completely hardened. They should easily just pop right out of the mold. You can store them in the freezer for years even or serve them a few hours after making. 

When defrosting them for serving, this is best done in the fridge for a few hours before they can be subjected to room temperatures. This will prevent any cracking when the filling is melting and expanding or water droplets building up on the candy, which can make the colors run. 

Like I said, I wanted my chocolates to be a homage to Greek desserts, most of which are made with honey and walnuts. I'm very opinionated about my Greek desserts. They should use walnuts, not peanuts or any other nut, EVER! The nuts should not be chopped! They should be fine like a dust. We use a hand cranked, cheese-like metal grader called a mouli. My husband swears its just a cheese grater, but whatever. It's a long and blistering process grating nuts this way but the effort pays off for the taste. No, you can't do it in a food processor! I mixed these nuts with the honey, slightly thinned in the microwave, until I had a paste and that was my filling. If you wanted the chocolates to be more like baklava, then you could add some baked phyllo crumbles. See my tutorial on working with phyllo dough here to do that. 

Honestly, this is a long process and making a dozen of these took me several hours. I'm sure most people have no urge to do this. I thought about selling these on Etsy since I've never seen any chocolates like this before. If only I could figure out how to ship them safely in the summer for a decent price. Thoughts? Suggestions? I just might sell them and save you the effort of making some...for less than $48 per six! Whoa! 
 
Recipe Inspired by Dean & Deluca

Wednesday, July 3, 2013

Skinny Coconut Shrimp


This recipe is so simple and so easy to keep light. Who needs to fry these babies up? You can get just as great of a crunch by baking them!
 
Peel your shrimp and de-vien them, leaving the tails on. Take out 3 plates. Spoon out 1/8 cup of flour on one, 1/2 cup of coconut on another, and a beaten egg on the remaining one for about a dozen shrimp. Dip the shrimp, one at a time, first into the flour. Coat evenly and shake off excess. Then into the egg mixture. Then into the coconut and gently press to coat well. For an added crunch, you can add some more flour after. Then place them in a baking dish sprayed with nonstick cooking spray and bake in a 425 degree oven for 10 minutes on one side. Flip them and cook an additional 5 minutes on the other. They are great hot out of the oven or even cold.
Serve these by themselves, with ketchup, or even a pineapple or mango chutney. They are wonderfully tropical...and don't forget...baked!

Tuesday, July 2, 2013

Thai Chicken Pizza

I found this great herbed pizza crust at Trader Joe's and it has been a really long time since I made a pizza at home. As usual, it had to be different. No sauce and mozzarella cheese here!

I loved California Pizza Kitchen, and I use the past tense because I liked all the unusual pizzas they had and so many have been taken off the menu. So, I of course, have to start recreating these at home. I ran a pizza restaurant for a few years so I tried to get through this without having Vietnam style flashbacks about my days in servitude. 
I started by prepping my dough. It was frozen, so I let it defrost and proof on my counter for several hours before touching it. Then I cleaned the surface I would be working on, made sure it was dry, and poured down some cornmeal. When stretching the dough out, you'll want to use that or semolina, which is more expensive. Coat both sides and ensure that your ball is pretty round. Then stretch it out a bit, flipping it a few times to coat any sticky parts with corneal. Stretch the dough with your fingers and slide the dough in a clockwise, circular motion, keeping your palm off the middle. Keep stretching until you have a fairly good size dough. Then gently pick up the dough from the bottom with fists and shake off excess cornmeal. Lay down in a pizza pan or on a pizza stone. Preheat your oven to 500 degrees. 

Pour peanut sauce into a ladle and then onto the crust. For the recommended sauce, see my blog on Thai Chicken Pasta. Use the back of the ladle to spread the sauce evenly, paying more attention to the edges, because everything will pool to the center. 
Then add a can of chicken breast or some pieces of leftover or rotisserie chicken. Julienne some carrots and spread them on as well in the same manner. 
Then add your desired cheese. I used about 2 cups of a shredded cheese blend. Top with some chopped peanuts and bake for 8 minutes. 
If you like, you can top with sprouts when it comes out of the oven. Cut into six or eight slices, twisting your wrist at the end of each pizza slice with the cutter to ensure that the slices separate.